Generative AI-Based Testing Certification
Settings
testRigor settings give users maximum flexibility to modify its built-in capabilities.

General
Modify test suite names.
Authentication
Basic/Digest HTTP Authentication
Some staging, dev, or other environments on desktop web browsers require a preliminary layer of authentication before access to the landing page is granted. These credentials are usually given through a browser popup every time a user tries to log in. Instead of doing this as steps in the test case scripts, testRigor allows users to enter the credentials into the fields in this setting which then allows testRigor to automatically handle the environment authentication.
App-specific Authentication
In order to establish the default username and password needed to log into the application, fill in the fields provided. These credentials will then be used as the built-in variables username and password. This allows testRigor to use its built-in login rule.
Proxy
When a website is not publicly accessible, testRigor needs a way to access the environment. The best way to do this is to whitelist our static IPs. However, there are several alternatives to connect. Some companies have a VPN or proxy that they can provide in the fields provided in this section.
Another way is via tunneling, which is essentially a reverse proxy. This involves the user installing a small program onto a server that has access to the environment that needs testing. This server acts as a with the user environment and testRigor servers. Users need to work with testRigor agents in order to configure this type of connection.
Speed optimizations
Speed optimizations is broken up into two categories: (1) Timeouts and Delays and (2) Performance.
Timeouts and Delays
Each page exhibits unique behavior, especially in terms of the speed at which elements become visible. The dropdowns in this part of our settings are designed to minimize the need for explicit waits within the test case scripts. Most of these settings effect every step of every test case, so it is important to consider this when determining optimal performance. Sometimes, explicit waits help avoid unnecessarily long delays in the settings. The key is to understand the balance between the platform’s general velocity and the processes that are outliers from that average.
Performance
These settings prioritize testRigor’s behavioral approaches over the user’s UI interactions. All of them influence the test case duration in one way or another, and as a result, the overall run time. Below are the most influential or least self-explanatory of these features and how they affect test cases.
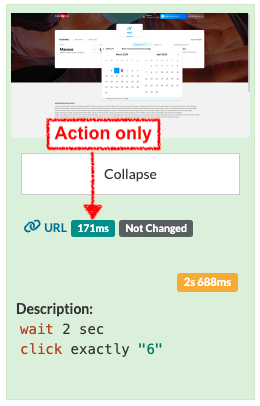
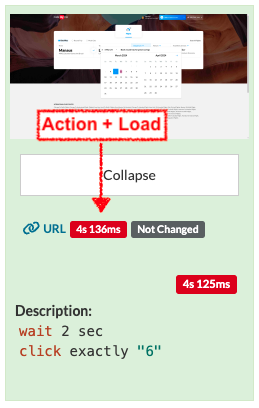
- Measure page load: This attempts to measure how long a page takes to load by checking when the page stops changing.
- The page load time is posted in the
More details...area below screenshots where available (page load is not posted on every screenshot because every step doesn’t cause the page to change). This is the same place where the action time is located, but when Measure page load is enabled, the time includes both the action and the load times. Compare screenshots of the same test, one without Measure page load enabled (left) and one with it enabled (right).
- The page load time is posted in the
 |
 |
-
- The time this adds is significant, so if it is not strictly necessary, this setting can be disabled to improve single execution and full retest run times.
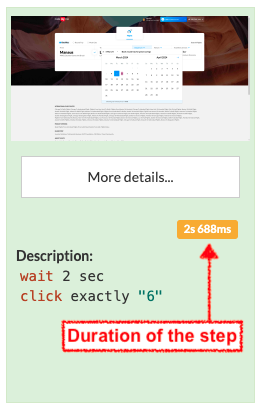
- Measure time between steps: This setting allows testRigor to display the duration of each step below its respective screenshot.
 |
- Wait for scripts: This forces testRigor to wait for scripts to load in order to ask the browser if the DOM is ready. This does not necessarily imply that the page is fully loaded as the scripts downloaded may be loading additional information onto the page.
- Allow parallel testing: This setting allows testRigor to run all the test cases of a suite at the same time or in parallel, which is the default mode. When disabled, test cases run one by one.
- Maximum number of parallel servers (up to 10000): This setting determines the number of cases that can run at the same time. If the number in this setting matches or exceeds the limit in the user plan, all the servers will be occupied by that suite when a full run is triggered.
- Maximum parallel batch size: When full retests are triggered, each testRigor server selects a batch of random test cases based on the number in this setting. Once a batch is gathered, the server runs the cases that belong to it sequentially. No other tasks will be taken by that server until the batch is completed. Larger batches ensure that more cases will get run when server usage is high. However, once a case is assigned to a batch, it can’t be re-assigned. One way this might have a negative impact is when cases in a batch are long and other servers complete their batches of shorter cases. Smaller batches mean that servers will have to be found more frequently during full retests. This may lengthen full runs when there is high user traffic, but it evens out run lengths in the previously mentioned scenario because cases are assigned as one server finishes.
- Strategy for reading screen information: This determines how testRigor views and interacts with pages. This is one of the most important settings to define from the beginning since test cases built in one mode tend to fail when run in the other mode.
- Visible first: The default mode is
Visible first, because it causes testRigor to behave more like a human would; that is, it views and interacts with a page based on what is presented in the viewport/screenshot. - Batched mode: Unlike
Visible firstmode,Batchedmode allows testRigor to view and interact with any element loaded in the DOM regardless of where it is in relation with the viewport.
- Visible first: The default mode is
- Getting visibility of elements approach: The “Getting visibility of elements approach” option is particularly significant. In batched mode, testRigor can detect any element loaded in the DOM, regardless of its visibility on the screen. Conversely, the visible-first mode restricts interactions to elements that are both visible and contained within the viewport.
- Maximum number of retries for failed tests: This settings tells testRigor to automatically retry test cases that fail 0, 1, or 2 times. The reason a user might want to allow test cases to retry is because there is a possibility that more than one test case could be using the same resource at the same time, causing one or both to fail, not because of an actual bug but due to this coincidence. The odds of them using the same resource simultaneously a second time is far less likely.
- Prioritize clicking on: This determines what type of elements testRigor looks for on
clickcommands.- Only buttons: testRigor considers links, images, buttons, and anything else that changes the mouse pointer to a pointer finger when hovered over as “buttons”. These are what testRigor looks for when a
clickcommand is used. - Switches and buttons: Checkboxes and toggles fall into the category of switches. This setting allows testRigor to prioritize these on the same level of buttons on
clickcommands.
- Only buttons: testRigor considers links, images, buttons, and anything else that changes the mouse pointer to a pointer finger when hovered over as “buttons”. These are what testRigor looks for when a
- Auto-scrolling: As the name suggests, testRigor automatically scrolls to certain elements before interacting. Auto-scrolling can be disabled by selecting Never from the dropdowns. Alternatively, auto-scrolling can be bypassed in test case scripts by adding the key phrase
without scrollingto the end of the command. The following are the options for auto-scrolling- Scroll to element before clicking or hovering over it
- Scroll to element before entering a value
- Scroll to element before validations
- Scroll to anchor before searching elements
- Span treatment: This setting is to determine whether users want testRigor to recognize nested spans the same way it reads labels.
Error Reporting
Error reporting is where users define the types of errors to consider. JavaScript, CSS, and accessibility reports are the main ones generated based on these settings. There is also the ability to report whether API calls are successfully made and that images are uploading properly. These reports generate a lot of information each step and can thus impact the overall duration of test cases.
Integrations
testRigor has the ability to integrate with the following tools. For most integrations, users will need to provide working account credentials with these tools.
Video recording of test cases: Enable and disable the video recording. No account connection or extra key is necessary.
Test case management tools: Azure DevOps, TestRail (two-way execution), Zephyr (Enterprise, Scale), HipTest, Xray Cloud, Report Portal
Issue reporting: Jira, Pivotal Tracker, Azure DevOps
SMS and phone calls: Twilio (send and receive sms and calls)
3rd-party Infrastructure Providers: LambdaTest, SauceLabs, BrowserStack, and Kobiton
Database connections: MySQL, PostgreSQL, SQL Server, Snowflake, and Grid Gain
Alerts: Pager Duty
Chrome Extensions: This is intended to test a Chrome extension developed by your development team as it requires the original extension file.
Test Generation
Test generation is simply the different ways that testRigor automatically builds test cases largely without human intervention. Each method has its pros and cons.
AI-Based Test Generation
The best use of AI to build test cases requires a detailed description of the application that it will interact with. Test case creation and self-healing are advantages of AI-based test creation. However, because AI is programmed to complete flows, it may attempt workarounds in certain scenarios where reporting a bug would be the preferred course of action.
Behavior-Driven Test Generation
Behavior-driven test creation uses analytics to determine how users interact with your application. It takes the most common scenarios and builds test cases based on them. Test cases built with this feature are tagged with the label Recorded. This helps companies learn there users’s behavior, but it doesn’t guarantee that this will increase test coverage of the features they know they want to cover.
Crawler-Based Test Generation
Crawlers go through the UI of an application and perform random actions on any button or field on the page. The actions that crawlers perform can be nudged with rules, settings, and default values for discovery, but they remain random for the most part. This increases coverage, but again, there is no guarantee that the scenarios will be useful.
Advanced section
The “Advanced” section houses settings for processing newly opened tabs, iframe depth, time zones, and other options. We offer checkboxes for enabling synonyms, OCR recognition, deepest element prioritization, inner child button location, OS and browser version on executions, and browser and HTTP request collection.
iframes
Simply put, an iframe is a page loaded inside another page. This is very common in development as there are fully developed, high-quality resources that can be embedded onto a page without having to develop the resource again. Streaming videos on a blog, maps on an e-commerce page, among others, are examples of resources that other websites might use in iframes. When talking about about iframe depth, iframes can be nested several levels. The iframe depth setting is necessary in cases where iframes are used. It tells testRigor that the targeted element might be inside the iframe instead of the parent html. If it is not activated, testRigor will not search the iframe for the targeted element, which can result mis-clicks or non-clicks even though the element is clearly visible on the page. To reach these elements, simply raise the iframe depth.
Synonyms
With this feature, testRigor identifies words with similar meanings, ensuring that minor word changes on pages won’t necessitate script alterations. Here’s how you can use synonyms to self-heal test cases when terminology on your page has slightly changed:
-
A message will be shown in Extra info below the screenshot if an element was found by a synonym in the test case. For example:
- Element ‘Well’ found by synonym ‘good’
- This option is enabled by default for new test suites.
- Suites created before the release of this feature have this option disabled to avoid changing the behavior of existing test cases.
Other advanced features
Additionally, we support custom attributes. If there’s an HTML tag we don’t recognize by default, users can assign that tag to aid element detection.
Users can also specify custom cookies to inject into a page before a test begins. This is beneficial for scenarios such as setting a language on multilingual sites or ensuring that users are logged in at the test’s start.
Furthermore, users have the option to specify the name of their site-wide loading spinner, allowing our system to automatically pause and wait until the spinner disappears before interacting with the page.
The Advanced settings also define our interactions with PDFs (to either download or view them), with clicks (determining if the default action should be via JavaScript or a mouse click), and with monitoring.